How to set up a live room - for beginners
Jun 08, 2022
The live studio setup is very important, it determines the first impression users have of us. If you want to become an internet celebrity, then you need a good live studio. So how should a beginner build a live studio?
7 steps to consider when building a live studio:
1.Choose the right space:
The best environment for a live broadcast room is an independent, quiet space with enough area. It can be your own office, homeroom, store cubicle, or outside to rent a venue. It is not recommended to live in the surrounding area where there is noise interference.

2.Live lighting settings:
A well-lit stream can help your live video look more professional and help you attract viewers. Think about it: you don't want your audience to cringe at how poorly your live stream is set up, and you certainly don't want the overhead lights in your office to cast harsh shadows on your speakers or presenters.
(1)Lighting for entry-level streams
Sunlight
Ring Light
Sunlight is a free source of live lighting, and finding the right balance of natural light creates the perfect live broadcast. Too much sunlight can obscure the details of a speaker's face, while too little can hide their features.
Ring lights are budget-friendly lighting sources for beginner-level streamers that don't pose a fire hazard or heat up the room, making them perfect for use. Their circular design also means that ring lights help eliminate shadows on the face.

(2)Intermediate lighting:
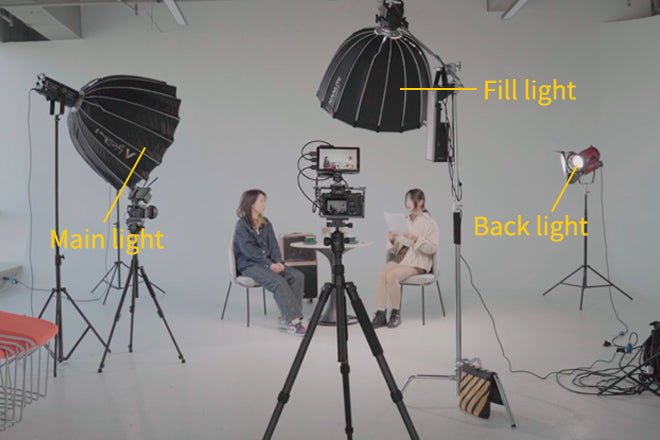
Three-point light kits
These kits include three lights: a main/primary light, a fill light, and a backlight to bring warmth, depth and quality to your live stream.
3.Background
(1)The background of the live broadcast room is a preferably solid color, but it is not recommended to be a large white wall. Pure white is easy to produce reflections, the light shines directly on the wall, will shine directly into the eyes of the audience,and a long time to see your live people will produce visual fatigue.
(2) Feature wall. Paint the wall behind you with an interesting accent color to make you stand out in front of the camera. This solution is more permanent, so if you can't solve this problem, try other ideas.
(3) Create a set. Maybe you don't even want to touch the walls of your home, but you still need a backdrop. You can build a "moveable wall" with some boards and then add wallpaper or paint to your liking.
(4) Chroma key (green screen). To give your studio background complete freedom, use the chroma key and insert the image/video as background. Our FEELWORLD brand has several live switchers that not only have the effect of green screen keying but also allow you to have a deeper moving live image.

Can you use any camera for live streaming?
Webcams, DSLRs, camcorders, PTZ cameras - as long as you use a camera capable of capturing at least 1080p at 30 fps, all of these can be used for live streaming.

5.Studio Soundproofing
To get professional quality streaming, you should try to eliminate background noise. Room soundproofing eliminates noise from outside the studio and reduces echoes from inside the studio. There are several techniques you can try to soundproof your live studio.
Installing acoustic foam panels on the walls is the best way to eliminate background noise. However, these panels can be expensive. Another option is to hang wool blankets on the walls. Anything soft, such as a duvet, towels,or sheets, is perfect for reducing sound waves from traveling too far.
When soundproofing, if you have neighbors living above you, you may want to consider installing soundproof panels in the ceiling. You will also have to add some carpet, rugs or foam tiles to the floor if you have people in the room below you.

6.Make sure you have a stable Internet connection
For a more stable Internet connection, try using an Ethernet cable instead of WiFi. in addition, disconnect other devices from your network when you are streaming. Close all applications or programs on your computer that you are not using for streaming and always keep your computer and modem up to date. To prevent losing your view, start testing your Internet speed using a site such as Speedtest.net. Here are some other tips to make sure your Internet connection is stable
(1)Upgrade your bandwidth or the amount of data you can upload to the highest available data.
(2)Let any other family members, roommates,or co-workers share your space to stay offline for the duration of your broadcast.
(3)Use your phone's hotspot as a worst-case scenario backup.
(4)Test your technology, including audio and video quality.

7.Audio
Your listeners will also check your audio quality, so don't neglect the audio quality of your live stream. If you're just starting to explore your audio device, we recommend our FEELWORLD FM8 microphone for battery-free, plug-and-play design and audio/video recording device compatibility. TRS for DSLR cameras, video recorders, DJI Osmo and GoPro (adapters required for DJI,and GoPro devices (not included). TRRS for smartphones (Newer iPhone and Android models require adapters (not included)). Plush windshields and windshields effectively block ambient sound and echoes for clearer and cleaner vocals.

Summary:
These are the 7 steps for beginners to consider. Learning to set up a live studio will not only make it easier and faster to set up and broadcast live, but it will also help build confidence in the broadcast. When you know your gear and what you can do with it, you'll feel more confident in front of the camera.